Tuesday, September 13, 2011

ActionScript 3 External Classes


This tutorial is all about external ActionScript 3 classes. I will teach you how to linkage movie clips to an ActionScript class and then we’ll create an external class.


The end product in seen above. The movie uses one external class and only a few lines of code is written in the main timeline. So why do we use external classes? To put it simple, external classes help you to stay more organized. External classes are part of a programming paradigm called “object oriented programming”. The subject is very broad, so I will not go into that. In this tutorial, you don’t need a great knowledge of OOP anyways. SO start your Flash IDE and let’s get started!

Setting up the environment

1. Create a new document of size 300×300.
2. Draw a star on the stage. The polystar will help you in that.
3. Convert the star into a movie clip. Give it a name “Star” and set the registration point to the center.
4. Linkage the movie clip to a class named “Star” (right click the movie clip in the library and select “Linkage”).
Linkage star
Linkage properties
Don’t worry about the ActionScript Class Warning. It warns you, because Flash can’t find a class named “Star”. That’s normal since we haven’t created that class yet!
5. Remove the star from the stage.

Moving into ActionScript 3

6. Create a new ActionScript file.
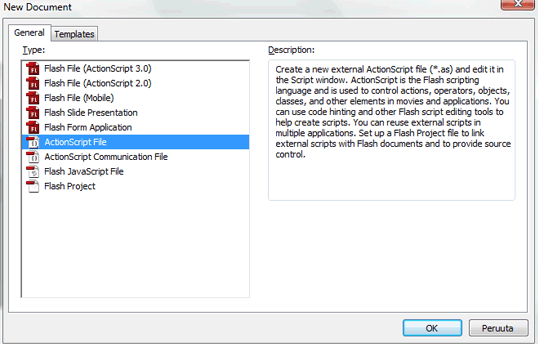
ActionScript file
7. Type the following in the class
package {
 
 import flash.display.MovieClip;
 import flash.geom.ColorTransform;
 import flash.events.*;
 
 /*
 This class represents the Star movie clip we drew on the stage.
 We extend this class to a movie clip, thus allowing us to use movie 
 clip's functions and properties.
 */
 public class Star extends MovieClip {
 
  private var starColor:uint;
  private var starRotation:Number;
 
  /*
  This is called the constructer of the class.
  It is called every time we create a new Star instance.
  In the constructor, we assign a random color to the star and set some 
  of it's properties.
  */
  public function Star () {
 
   //Calculate a random color
   this.starColor = Math.random() * 0xffffff;
 
   // Get access to the ColorTransform instance associated with star.
   var colorInfo:ColorTransform = this.transform.colorTransform;
 
   // Set the color of the ColorTransform object.
   colorInfo.color = this.starColor;
 
   // apply the color to the star
   this.transform.colorTransform = colorInfo;
 
   //Assign a random alpha for the star
   this.alpha = Math.random();
 
   //Assign a random rotation speed
   this.starRotation =  Math.random() * 10 - 5;
 
   //Assign a random scale
   this.scaleX = Math.random();
   this.scaleY = this.scaleX;
 
   //Add ENTER_FRAME where we do the animation
   addEventListener(Event.ENTER_FRAME, rotateStar);
  }
 
  //This function is responsible for the rotation of the star
  private function rotateStar(e:Event):void {
   this.rotation += this.starRotation;
  }
 }
}
8. Save the file as “Star.as” in the same directory where your main movie is (this is very important!). The movie won’t work without the correct file name and location. File names must always be the same as the class name.
9. You can close the ActionScript class now. Go to your main movie and type the following code in the first frame.
/*
Create 100 stars on the stage.
Assign a random position to each.
All the star animation etc. are done in the "Star" class.
*/
for (var i = 0; i < 100; i++) {
 var star:Star = new Star();
 star.x = stage.stageWidth * Math.random();
 star.y = stage.stageHeight * Math.random();
 addChild (star);
}
10. You are done, test your movie! I hope you enjoyed this tutorial and learned something from it. If you have any questions concerning this tutorial, please visit the forum. Have a nice day!
Read more »

ActionScript 3 Color Picker


In this tutorial, I’ll show you how to change a movie clip’s color with ActionScript 3.0 using the color picker. So start up your Flash and let’s learn something new! At least I hope so…

Setting up the environment

1. First we add the color picker to the stage. In your “Components” window, drag the “ColorPicker” to the top left corner of the stage. If you don’t see the “Components” window, select Window -> Components (Ctrl + F7).
2. Give the color picker an instance name of “myColorPicker”.
3. Now draw a movie clip to the stage. It doesn’t matter what you draw, just make it white since that’s our starting color. I drew a star using the PolyStar Tool.
4. Give your movie clip an instance name of “myStar”.
5. Now let’s make the bottom text boxes. In the bottom left corner, draw a dynamic text field and type “Current color selected:”.
6. Draw another dynamic text field next to the first one. Don’t write anything there, just give it an instance name of “myCurrentColor”. We’ll be changing the text dynamically from ActionScript.

Moving into ActionScript 3.0

6.Create a layer for ActionScript and type the following.
import fl.events.ColorPickerEvent;
import flash.geom.ColorTransform;
 
//Set the color to white at the beginning
myColorPicker.selectedColor = 0xffffff;
 
// Get access to the ColorTransform instance associated with star.
var colorInfo:ColorTransform = myStar.transform.colorTransform;
 
//Add a listener that dispatches an event when user selects a new color
myColorPicker.addEventListener (ColorPickerEvent.CHANGE, colorChanged);
 
function colorChanged (e:ColorPickerEvent):void {
 
 // Set the color of the ColorTransform object.
 colorInfo.color = myColorPicker.selectedColor;
 
 // apply the change to the display object
 myStar.transform.colorTransform = colorInfo;
 
 //Show the selected color in the text field
 myCurrentColor.text = myColorPicker.hexValue;
}
You are done, hope you enjoyed this Flash ActionScript 3 tutorial. If you have any questions concerning the tutorials, please visit the forum.
Read more »

ActionScript 3 Timer Class


ActionScript 3 timers are used to run pieces of code on a specific time sequence. They come in real handy when you want something to be done repeatedly, but not in every frame. This tutorial teaches you the basics of ActionScript timers and how to use them in your flash movies.

Setting up the environment

1. Create a new Flash ActionScript 3.0 document of size 400×400.
2. Create a dynamic text field of size 100×60. You can draw it anywhere on the stage.
3. Embed the numerals of the text field. We need to do this, because we’ll be animating the numbers later on. Give the text field an instance name of “myNumberTextBox”.
Embed numerals
4. Convert the text field into a movie clip. Name it myNumberMC. Set the registration point in the center.
5. Linkage the movie clip to a class called “NumberMovieClip”.
6. Remove the movie clip from the stage.

Moving to ActionScript 3.0

Now it’s time for the timer. Create a layer for ActionScript and type the following.
//We need these for the animation
import fl.transitions.*;
import fl.transitions.easing.*;
 
/* 
Create a timer that is called once every second (1000 milliseconds).
This timer will be called infinitely, because the second parameter is zero.
*/
var timer:Timer = new Timer(1000,0);
timer.addEventListener (TimerEvent.TIMER, changeNumber);
timer.start ();
 
//Create the smaller number seen on the stage
var myNumber:NumberMovieClip = new NumberMovieClip();
 
//Position the number in the center of the stage
myNumber.x = stage.stageWidth / 2;
myNumber.y = stage.stageHeight / 2;
 
//Add it to the stage
addChild (myNumber);
 
//Make it invisible at the beginning
myNumber.visible = false;
 
//Create the larger number seen on the stage
var myNumberBig:NumberMovieClip = new NumberMovieClip();
 
//Position the number in the center of the stage
myNumberBig.x = stage.stageWidth / 2;
myNumberBig.y = stage.stageHeight / 2;
 
//Make it a lot bigger (you can change these to whatever you want)
myNumberBig.scaleY = 20;
myNumberBig.scaleX = 20;
 
//Reduce the alpha
myNumberBig.alpha = 0.1;
 
//Add it to the stage
addChild (myNumberBig);
 
//Make it invisible at the beginning
myNumberBig.visible = false;
 
/* 
Our timer calls this function.
The timer delay defines how frequently this function is called.
*/
function changeNumber (e:Event):void {
 
 /*
 Make our numbers visible.
 */
 myNumber.visible = true;
 myNumberBig.visible = true;
 
 //Assign a new numerical value for the movie clip
 myNumber.myNumberTextBox.text = String(e.target.currentCount - 1);
 
 /*
 Animate the smaller number using the TransitionManager.
 The animation lasts exactly as long as our timer delay is.
 */
 TransitionManager.start (myNumber, {type:Fade, direction:Transition.IN, 
  duration:(timer.delay * 0.001), easing:Regular.easeIn});
 
 //Assign a new numerical value for the movie clip
 myNumberBig.myNumberTextBox.text = String(e.target.currentCount - 1);
 
 /*
 Animate the larger number using the TransitionManager.
 The animation lasts exactly as long as our timer delay is.
 */
 TransitionManager.start (myNumberBig, {type:Zoom, direction:Transition.IN, 
  duration:(timer.delay * 0.001), easing:Regular.easeIn});
}
Test your movie, and you should have a similar movie as mine. There is one other timer event available for you to use. It’s called the “timerComplete”. As the name suggests, it is called when the timer finishes. In this tutorial, that would be never, since our timer will run infinitely. That’s the end of this tutorial. If you have any question concerning the timer, please post them in the forum.
Read more »